
There are several out-of-box task flows to be used to access and manage Oracle UCM easier after Oracle WebCenter 11g RC1 is released. Those provide seamless integration to Oracle UCM on WebCenter.
We used the Document Library – List View task flow in one of our custom WebCenter applications as document manager to Oracle UCM.
But unfortunately, the out-of-box functions of those task flows are not enough according to our requirements.
Here we had two addition requirements over that:
- (1) To display contents’ HTML Rendition column on document query list table;
- (2) A specific and more complex document check in form, in place of the default one.
As the default functions were really useful to us and it was able to be customized, we decided to customize one of task flows (Document Library – List View task flow) to implement ours inside together.
Please refer to the below document published on OTN, which describes how to customize the task flow:
http://www.oracle.com/technology/products/webcenter/pdf/owcs_r11_custom_taskflow_wp.pdf
Preparing a Customizable WebCenter Application
Open JDeveloper as the Default role:
(1) Preparing a Customizable WebCenter Application
To customize the task flows in your WebCenter application, first ensure that you have a custom WebCenter application (that is, an application you’ve created using the WebCenter template).
For example, naming it as “DocListCustomization”, this is a WebCenter application.

(2) Creating the Customization Classes
Once you have a WebCenter application, you must make the customization classes that you want to use in your application. A customization class is the interface that MDS uses to define which customization applies to the base definition metadata. Each customization class defines a customization layer and can contain multiple layer values.
For example: Creating a java class naming WCSiteCC, which extends “oracle.mds.cust.CustomizationClass”
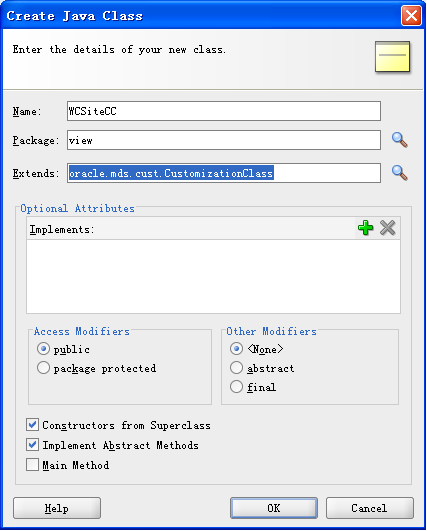
(3) In the Source code of the WCSiteCC.java file, replace the code with the following:
package view;
import java.io.IOException;
import java.io.InputStream;
import java.util.Properties;
import oracle.mds.core.MetadataObject;
import oracle.mds.core.RestrictedSession;
import oracle.mds.cust.CacheHint;
import oracle.mds.cust.CustomizationClass;

public class WCSiteCC extends CustomizationClass {

    private static final String DEFAULT_LAYER_NAME = “site”;

    private String mLayerName = DEFAULT_LAYER_NAME;

    public WCSiteCC() {
    }

    public WCSiteCC(String layerName) {
        mLayerName = layerName;
    }

    public CacheHint getCacheHint() {
        return CacheHint.ALL_USERS;
    }

    public String getName() {
        return mLayerName;
    }

    public String[] getValue(RestrictedSession sess, MetadataObject mo) {
        return new String[] {“webcenter”};
    }
}
Note: The example code uses a customization layer “site” with the value “webcenter”.
(4) Make the Customization Classes Available to JDeveloper
After you create the customization classes, you must make them available to JDeveloper so that you can use them when implementing customizations. When working in JDeveloper Customization Developer role, your customization classes must be available in JDeveloper’s classpath.
So next to package the customization classes as a jar and add them into your custom project classpath.
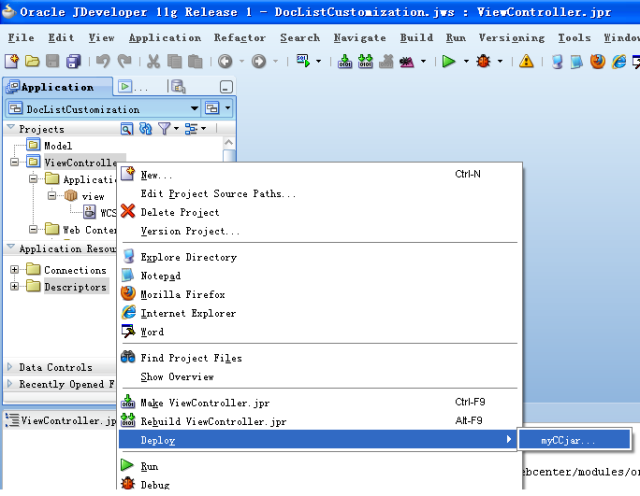
For example, creating a new deployment profile of JAR File as follows:

In the Application Navigator, right-click the ViewController project and choose Deploy > myCCjar > To Jar file to deploy the JAR.
Then adding this new jar into your custom WebCenter application’s classpath.

(5) Enable Seeded Customizations for View Projects in WebCenter Applications
In the Application Navigator, right-click the ViewController project, and choose Project Properties.
In the Project Properties dialog, select ADF View, then select the Enable Seeded Customizations checkbox.

Click OK and save your files.
(6) Configure the Design Time Customization Layers for JDeveloper
To enable customization of WebCenter task flows at design time, you must configure the CC layer values that you want to use in the JDeveloper Customization Developer role. In your file system directory, in JDEV_HOME/jdev, open the CustomizationLayerValues.xml and configure the CC layer values.
In the following example, the “site” Layer is configured with the value “webcenter” for the JDeveloper Customization Developer role.
Example 2: Customization Layer
<cust-layers xmlns="http://xmlns.oracle.com/mds/dt">
    <cust-layer name="site" id-prefix="s">
        <cust-layer-value value="webcenter" display-name="WebCenter"/>
    </cust-layer>
</cust-layers>
(7) Configure Your Application’s adf-config.xml File
The application’s adf-config.xml file must have an appropriate cust-config element in the mds-config section. The cust-config element allows clients to define an ordered and named list of customization classes. You can use the overview editor for the adf-config.xml file to add customization classes.
In the Application Resource panel, under Descriptors > ADF META-INF, open the adf-config.xml. Before you make any changes to the code, back up the adf-config.xml file.
In the Overview editor, select MDS Configuration. Add the WCSiteCC class to the file to generate MDS custom configuration, and save all your files.

(8) Restart JDeveloper in the Customization Developer Role and Verify the Configuration
After you’ve enabled customization for your application, you can switch to the Customization Developer role and begin customizing your task flows.
In JDeveloper, choose Tools >Preference > Roles, select Customization Developer role, and then click OK.
JDeveloper prompts you to restart. Choose Yes to restart JDeveloper in the Customization Developer Role.

In JDeveloper, in the Customization Developer role, you will see a Customization Context window with ‘Edit with following Customization Context” radio button selected and customization layer name selected as “site” and “webcenter” as the layer value. If you see that means that you have successfully configured SampleWebCenterApplication to enable customization of Oracle WebCenter task flows.

Customizing WebCenter Task Flows: Document Library – List View
This example shows how you can customize the Document Library – List View task flow to add two additional functions described above.
- (1) Adding a column to display contents’ HTML Rendition;
- (2) Adding a new check in form with specified metadata to be set.
Before you perform these steps, ensure that you have prepared a customizable WebCenter application.
To customize the Document Library – List View task flow:
(1) In the Resource Palette, under My Catalogs, expand the WebCenter Services Catalog, and open the Task Flows folder.
(2) Right-click Document Library – List View and choose Add to project. If a confirmation dialog displays, click Add Library.
(3) In the Application Navigator, expand the ViewController project to view the “WebCenter Document Library Services View” library.

If you cannot find the library, right click the ViewController project, select “Navigation Display Options” on the right of the Projects bar, and then tick “Show Libraries”:

(4) In the WebCenter Document Library Services View library, open the docListViewerTableTemplate.jspx file under oracle.webcenter.doclib.view.jsf.fragments.

(5) Adding a new additional column after ITEM_NAME_COLUMN_HEADER to display its HTML Rendition

In the Structure Panel, right-click the column with title #{dlBndl.ITEM_NAME_COLUMN-HEADER} and choose copy and paste, then a new ADF Column Component was created automatically.
In the Property Inspector for the new ADF Column component, change the headerText property to “HTML Rendition”.
In the Structure Panel, expand this new column and delete the af:image component

Right click af:goLink component inside af:switcher -> f:facet – false and choose Go to property:

Change the values of Text and Destination inside.
For example:
Text=” Get Conversion (HTML)”
Destination=”http://host:port/idcplg?IdcService=GET_DYNAMIC_CONVERSION&dID=#{item.dID}&coreContentOnly=1#{item.portletLinkPostfix}"

(6) Save all your files.
(7) All the customizations happened on the same page will be written into the file docListViewerTableTemplate.jspx.xml under libraryCustomizations folder in your project physical path.
The above customization source will looks like below:
(8) Now you can test it simply. Create a new jspx page naming “docslist.jspx”, then drag and drop Document Library View from Resource Palette on the page in JDev.
<af:column xmlns:af="http://xmlns.oracle.com/adf/faces/rich" id="column1"
sortable="true" sortProperty="name" customizationId="namCol"
headerText="HTML Rendition">
<af:panelGroupLayout xmlns:af="http://xmlns.oracle.com/adf/faces/rich"
id="panelGroupLayout1">
<af:switcher xmlns:af="http://xmlns.oracle.com/adf/faces/rich"
facetName="#{item.folder}" id="switcher1">
<f:facet xmlns:f="http://java.sun.com/jsf/core" name="false">
<af:goLink xmlns:af="http://xmlns.oracle.com/adf/faces/rich"
id="goLink1" text="Get Conversion (HTML)"
destination="#{myUploadBean.ecmUrl}/idcplg?IdcService=GET_DYNAMIC_CONVERSION&dID=#{item.dID}&coreContentOnly=1#{item.portletLinkPostfix}"
shortDesc="#{item.urlToolTip}" targetFrame="_blank"/>
</f:facet>
<f:facet xmlns:f="http://java.sun.com/jsf/core" name="true"/>
</af:switcher>
</af:panelGroupLayout>
</af:column>
(9) Then right click the page in the Application Navigation and choose Run. You will find the document list table having one more column named HTML Rendition on the page.

(10) Then you can follow the similar way described above to add a new check in form in this task flow.
See from the above diagram of the customized task flow, there is also a new button “Upload” to pop up the dialog to display a new check-in form for the end user, which looks like below:

Each drop down list values in the new check-in form are from Oracle UCM each metadata preconfigured values. So I used Content Repository Data Control to query data from UCM.
But after you define the data control and drag and drop methods of it on this page, it would report an error of no page definition created for this page and it is not allowed to generate it automatically in WebCenter RC1 release.
So how to solve this problem?
There are two ways:
1) One is to create page definition and add it into DataControls.cpx file manually, which need to repack the WebCenter Document Library Service View lib after that.
And each time when this task flow is customized like this, you will have to replace the original library with the updated one in the server container.
But it is very complex and you have to be very careful to work it out.
2) The other is to share the page definition of the page where uses this customized task flow. In other words, to use the definitions of the parent page.
Comparing the first solution, it is much easier.
For example,
Drag and drop the getItems.Return from the content repository data control on your own page docslist.jspx, which generates a tree on the page and the data bindings in its pageDef automatically.
Go to check the pageDef of your own page, it looks like the below:
<?xml version = '1.0' encoding = 'UTF-8'?>
<pageDefinition xmlns="http://xmlns.oracle.com/adfm/uimodel" version="11.1.1.53.92" id="docslistPageDef" Package="view.pageDefs">
   <parameters/>
   <executables>
      <taskFlow id="doclibdocumentlistviewer1" taskFlowId="/oracle/webcenter/doclib/view/jsf/taskflows/docListViewer.xml#doclib-document-list-viewer" xmlns="http://xmlns.oracle.com/adf/controller/binding">
         <parameters>
            <parameter id="taskFlowInstId" value="${''}" xmlns="http://xmlns.oracle.com/adfm/uimodel"/>
            <parameter id="showFolders" value="${true}" xmlns="http://xmlns.oracle.com/adfm/uimodel"/>
            <parameter id="connectionName" value="${'ecm'}" xmlns="http://xmlns.oracle.com/adfm/uimodel"/>
            <parameter id="startFolderPath" value="${'/Contribution Folders/MUSE'}" xmlns="http://xmlns.oracle.com/adfm/uimodel"/>
            <parameter id="creator" value="${''}" xmlns="http://xmlns.oracle.com/adfm/uimodel"/>
            <parameter id="lastModifier" value="${''}" xmlns="http://xmlns.oracle.com/adfm/uimodel"/>
            <parameter id="createdBefore" value="${''}" xmlns="http://xmlns.oracle.com/adfm/uimodel"/>
            <parameter id="createdAfter" value="${''}" xmlns="http://xmlns.oracle.com/adfm/uimodel"/>
            <parameter id="lastModifiedBefore" value="${''}" xmlns="http://xmlns.oracle.com/adfm/uimodel"/>
            <parameter id="lastModifiedAfter" value="${''}" xmlns="http://xmlns.oracle.com/adfm/uimodel"/>
         </parameters>
      </taskFlow>
      <variableIterator id="variables"/>
      <methodIterator Binds="getItems.result" DataControl="ContentDataControl" RangeSize="25" BeanClass="view.ContentDataControl.getItems_return" id="getItemsIterator"/>
   </executables>
   <bindings>
      <methodAction id="getItems" RequiresUpdateModel="true" Action="invokeMethod" MethodName="getItems" IsViewObjectMethod="false" DataControl="ContentDataControl" InstanceName="ContentDataControl" ReturnName="ContentDataControl.methodResults.getItems_ContentDataControl_getItems_result">
         <NamedData NDName="path" NDValue="/Contribution Folders/MUSE" NDType="java.lang.String"/>
         <NamedData NDName="type" NDValue="nt:folder" NDType="java.lang.String"/>
      </methodAction>
      <tree IterBinding="getItemsIterator" id="Return">
         <nodeDefinition DefName="view.ContentDataControl.getItems_return" Name="Return0">
            <AttrNames>
               <Item Value="name"/>
            </AttrNames>
            <Accessors>
               <Item Value="Items"/>
            </Accessors>
         </nodeDefinition>
      </tree>
   </bindings>
</pageDefinition>
As the tree is generated and doesn’t need to display on your own page, go to the source of your own page, delete or comment the tree definition:
Now change to Customization Developer role in JDeveloper to customize the task flow and restart JDeveloper.
After that, open up docListViewerTableTemplate.jspx file, drag and drop an ADF tree component from the component palette on this page under the popup component.
Then set the value of this tree as #{bindings.Return.treeModel} when the tree properties window pops up.
OK. The customizations are done and located under the ADF Library Customizations (libraryCustomizations folder) of the current project in JDeveloper.
Back to Default role in JDeveloper, run and test your own page.
Note: don’t forget to wrap the task flow in an ADF form (af:form) component with useUpload set as true, as it will upload a file in this task flow first before it is checked in.


Best example..Great